Robin Egg Cake Recipe
Introduction
The Robin Egg Cake is a delightful layered cake featuring bright lemon flavors and blueberry jam with a rich, creamy frosting. This cheerful dessert is perfect for celebrations or whenever you want to impress with a fresh, flavorful treat.
Ingredients
- 2 3/4 cups (330g) King Arthur Unbleached Cake Flour
- 1 2/3 cups (333g) granulated sugar
- 1 tablespoon (12g) baking powder
- 3/4 teaspoon table salt
- 12 tablespoons (170g) unsalted butter, softened
- 2 large egg whites, at room temperature
- 3 large eggs, at room temperature
- 1 cup (227g) milk, at room temperature, whole preferred
- 2 teaspoons lemon paste or 1 to 2 tablespoons lemon zest
- 2/3 cup (230g) blueberry jam or lemon curd
- 8 tablespoons (113g) unsalted butter, at room temperature
- 1/2 cup (92g) vegetable shortening
- 1/8 teaspoon table salt
- 5 to 6 cups (567g to 681g) confectioners’ sugar, sifted
- 2 teaspoons King Arthur Pure Vanilla Extract
- 1/3 cup (78g to 113g) milk or 1/2 cup (78g to 113g) heavy cream, at room temperature
- Natural food coloring, optional
- 1 tablespoon (5g) unsweetened cocoa
- 1 to 1 1/2 tablespoons (14g to 21g) warm water or vanilla extract
- 1/4 to 1/2 cup (21g to 42g) toasted coconut flakes, for sprinkling on top
- Chocolate eggs or candy of your choice
Instructions
- Step 1: Preheat the oven to 350°F. Lightly grease three 6” round pans or two 8” or 9” round pans. For extra protection against sticking, dust the pans with flour or line the bottoms with parchment and grease the parchment. Ensure pans are at least 2” tall; if shorter, see tips below.
- Step 2: Using a stand mixer on low speed, mix the flour, sugar, baking powder, and salt until combined. Add the softened butter and mix until the mixture resembles fine, damp sand.
- Step 3: Beat in egg whites one at a time, then the whole eggs one at a time, beating about 30 seconds and scraping the bowl after each addition to build cake structure.
- Step 4: Whisk milk with lemon paste or zest in a small bowl. Add to batter in thirds, beating 30 seconds and scraping bowl after each addition. Batter may look curdled; this is normal.
- Step 5: After final scrape, beat for an additional 30 seconds.
- Step 6: Pour batter into prepared pans. Bake 6” cakes for 20–25 minutes, 8” or 9” cakes for 30–35 minutes, until set and pulling away from edges. A toothpick should come out with moist crumbs.
- Step 7: Cool cakes in pans for 15 minutes, then transfer to a rack to cool completely before frosting.
- Step 8: To make frosting, beat butter, shortening, and salt until fluffy in a large bowl.
- Step 9: Add half the confectioners’ sugar slowly, mixing until combined.
- Step 10: Add vanilla and half the milk or cream; beat until fluffy.
- Step 11: Add remaining sugar and milk, beating until fully incorporated.
- Step 12: Add a few drops of food coloring if desired and beat until light, fluffy, and evenly colored.
- Step 13: When cake layers are cool, level each by cutting off domes if needed.
- Step 14: Place a small dollop of frosting on your serving plate to prevent sliding; place the first cake layer on top. Use a turntable if you have one. Line plate edges with parchment strips to keep clean.
- Step 15: For 6” cake, spread about 3 tablespoons (46g) buttercream on the layer; for 8” or 9” cake, use about 1/4 cup (65g) frosting thinly.
- Step 16: Pipe a 1/4″ tall frosting ring (dam) around the top inside edge to hold filling.
- Step 17: Fill the ring with blueberry jam or lemon curd just below the frosting dam’s top.
- Step 18: If making a 6” cake, repeat layering with the second cake layer the same way.
- Step 19: For the final layer, place cake on top of filling with cut side down to keep top flat and crumb-free.
- Step 20: Apply a thin crumb coat of frosting over top and sides, then chill cake in refrigerator for 15–20 minutes. Cover and set aside remaining frosting.
- Step 21: Remove cake from fridge and stir frosting to remove air bubbles. Add extra milk if frosting is thick.
- Step 22: Using an offset spatula, cover cake with a final layer of frosting. Smooth sides with a straight-sided tool held at a straight angle while turning the cake to achieve a smooth finish.
- Step 23: For chocolate speckles, mix cocoa powder with warm water or vanilla until smooth.
- Step 24: Cover surrounding surfaces with parchment or newspaper to catch splatter.
- Step 25: Dip a dry pastry brush in cocoa mixture and shake off excess. Pull bristles back and release to flick speckles onto cake. Practice on parchment first if needed.
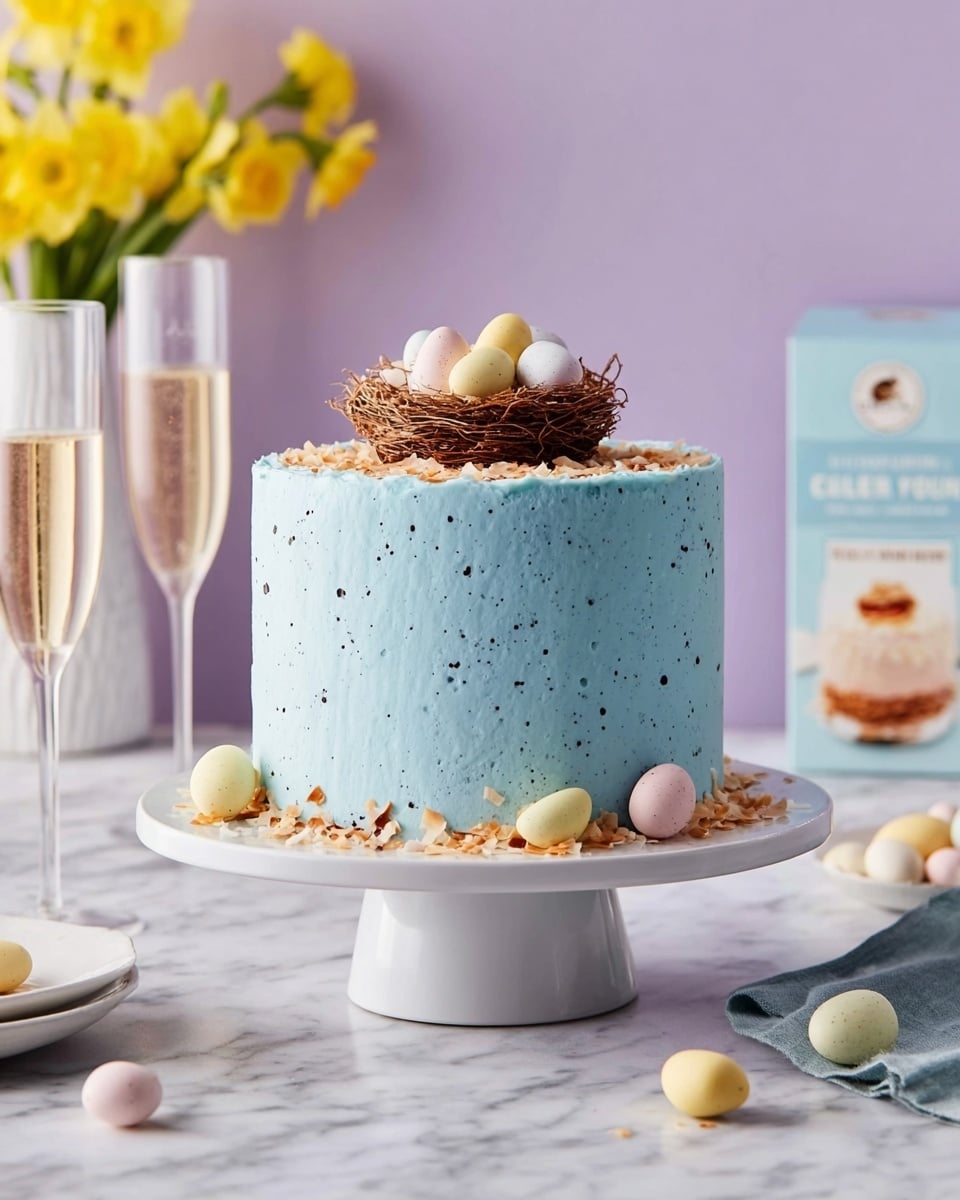
- Step 26: To create a nest, use a round cookie cutter or glass to mark a circle on top of the cake.
- Step 27: Pipe a few rings of frosting along the circle to form the nest.
- Step 28: Cover the frosting nest with toasted coconut flakes and fill with chocolate eggs or your choice of candy before serving.
- Step 29: Store leftover cake covered in the refrigerator for up to one week or freeze well wrapped for up to one month.
Tips & Variations
- If your cake pans are shorter than 2”, use two pans and split the batter to avoid overflow.
- Try lemon curd for a tangier filling or blueberry jam for a fruity twist.
- Practice flicking chocolate speckles on parchment before decorating the cake to perfect the technique.
- Use heavy cream in the frosting for a richer texture.
- Adjust food coloring to create your desired shade for a festive look.
Storage
Store leftover cake covered in the refrigerator for up to one week. For longer storage, freeze the cake well wrapped for up to one month. When ready to serve, thaw overnight in the refrigerator. Allow cake to come to room temperature for the best texture before enjoying. If the frosting firms up in the fridge, stir gently before reapplying.
How to Serve
Serve this delicious recipe with your favorite sides.
FAQs
Can I make this cake in advance?
Yes! You can bake the cake layers and prepare the frosting a day or two ahead. Store layers wrapped tightly to keep them moist, and assemble the cake just before serving for the freshest result.
What can I use instead of lemon paste?
If you don’t have lemon paste, fresh lemon zest works well. You can also use 1 to 2 tablespoons of lemon juice, but reduce the milk slightly to keep batter consistency.